
Nanolif’s new 12-sided light-up remote joins its existing Nanolif Light panel and Nanolif’s rhythm, adding alternatives to smartphone-free physical restraints to easily usable accessories for your homekit setup.
The Nanolif Remote is larger than other companies’ buttons and remote devices, but it provides access to many more scenes and you will see in my review, if you already own a nanolif setup and want an ordinary iPhone-free control system that anyone in the family can use.
For strangers with Nanolif, the company creates a nanolif light panels, creating a homekit-enabled set of flat, triangle-shaped lights that combine in a range of different user-well-configured configurations, providing both light and art. There are LEDs inside the light panels and can be set to show dozens of different colors and patterns, which produce different light recipes.
I have setup a nanolif for more than a year and it continues as one of my favorite homecut products. The remote is especially designed for users who already have nanolif light panels.
Design
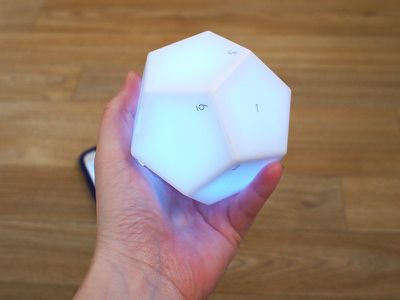
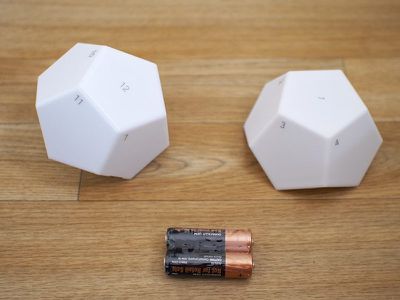
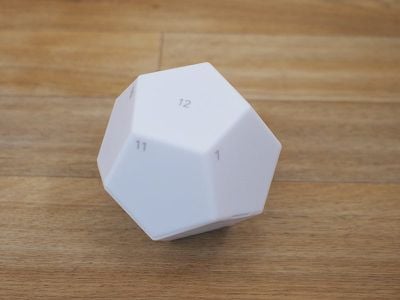
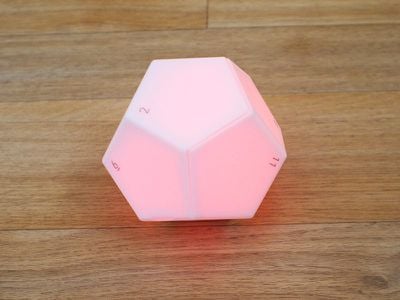
Nanolif’s remote contains a design that is not like any other homecut-enable remote-style device in the market, in the shape of the dodecahedron where each party activates a separate scene.
The remote, somewhat larger than the palm size, is made from a white plastic that acknowledges a bit cheaper, but it does not look bad at any desk.
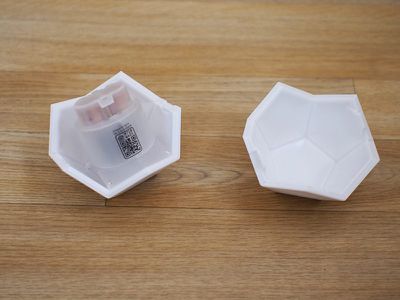
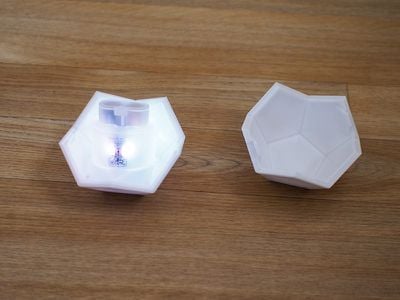
When the remote appears, it comes in two parts, an empty side and a side battery, an LED light and the process that provides a little vibration whenever a new scene is activated. The two AA battery (included in the package) fits the battery to the bogie for power supply.
Once the batteries are selected, the two parts of the remote snap are together. I was not able to get a perfect, paused, uninterrupted fit between the two parts, but it could be the operator error.
I am not sure how long the battery lasts is meant but after about two weeks use the battery level has dropped to 85 percent. I suspect that the batteries should be changed every few months, which is similar to the other battery -powered homecut device I owned.
Setup
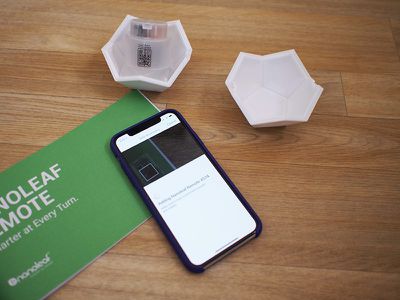
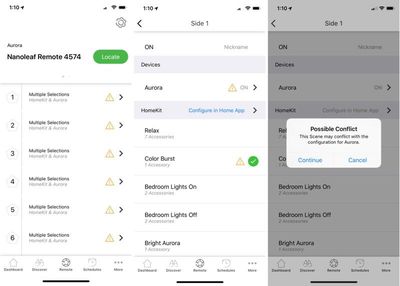
The remote took less than 30 seconds using the nanolif app set up and it was as easy as setup of any other homekit product. Under the remote section of the application, there is an “ad accessories” option, which requires a homecot code inside the nanolif remote. Once it is complete, the remote is added to the homekit setup and the scenes can be set to the nanolif application or home app.
On iOS devices, nanolif light panels and nanolif remote work on homekit and a homekit setup are required. You can also associate the remote with the rhythm of the nanolif, but it is necessary to enable complete effectiveness as the brightness controls. A nanolif rhythm sunsh, which attaches to light panels so that allowing them to respond to the sound, does not work by adjusting the brightness.
Both the homecut setup and the nanolif rhythm will add some error alert to the Nanolif app. These error alerts exist because the dual pair creates a connection between the modified changes in the programmed scene in the nanolif app.
For example, if you set a “goodnight” scene on a side of the home app and then set a separate view on the same side of the nanolif app, it would not sync and ignore one another. It was not a problem with everyday use because I just got stuck to change the home app, but I think it is confusing. Nanolif says that the app and website will be improved on the app and website to explain this conflict better.
According to Nanolif, you will need a home hub to use the remote on iOS devices, which means you need to have an iPad connected to your homepod, Apple TV or Homekit.
Use and app
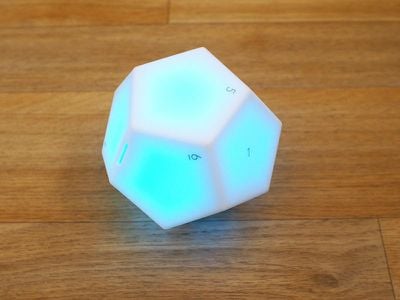
Activating a scene with the Nanolif Remote, lifting it up, turning it to a side of the Dadecahedron and then setting it again and then set down. After a few seconds you have to keep it, it will vibrate, illuminate and the direction of the direction that faces will be activated.
When each side of the remote is activated it is enlightened with a unique color and one corner also has a number for each party, so it is easy to say from one direction to the other. If you need to memorize what a number does, it takes a few days to learn your scenes if you do not change frequently.
I like the light built on the remote and I hope that I can always set it, but it will probably kill the battery very quickly. As it is, it often appears when the colors with white are often displayed when you rotate it.
The Nanolif Remote recognized every party of the Dadecahadron properly and my accident did not have trouble activating scenes that I didn’t mean. A scene will be activated on the basis of which direction it ends when you stop rotating, so remember it. The remote is rotated and it takes second or two when a scene is activated.
In addition to rotating the distant scenes to activate the homecot scenes, you can twist it to clockwise or clockwise to change the brightness of the nanolif light panels if you associate it with nanolif rhythm. A clockweight turn makes light panels even brighter, while the turn against a clockwise turn makes them fade.
This way it was convenient to control the brightness and did well, but the nanolif remote was the easiest to do it while on a desk or other flat surface without keeping me in my hand.
In the home app (or nanolif app) a homekit scene (or multiple homekit views) can be allocated on each side of the distant. Although there are different gestures of other buttons like this, the nanolifs are all single press because scenes are activated through rotation than different presses.
If you already have a homekit-connected nanolif setup, you know that all the nanolif light recipes you installed also have homecit scenes, so all your favorite nanolif patterns are available in the Home App you are available for other homekit products.
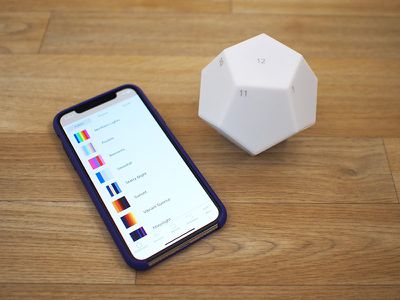
If you prefer to use the Nanolif app for a remote scene, the interface is almost identical. If connected to the homekit, it enroll all of your pre-existing homekit scene and you can choose one from there.
Although the remote is meant to control the nanolif light panels, it can also control your other homekit products. You can use any scene with a nanolif color scene, rhythm scene and a remote with multi-divide homekit scene.
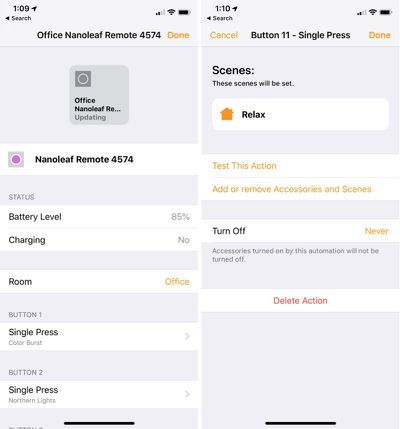
For example, 11 in my office next to the Nanolif Remote Side 11 to reject all the hue lights in my office to reject all the hue lights in my office after working in a scene that I say “Relax”, while Side 12 is set in a “good night” scene that turns all the lights off all the lights of the room.
Bottom line
After some time I refused to connect to my homekit setup, I had a problem with some buttons and remote-style homekit products, but this was not a problem with the Nanolif Remote.
I have been experimenting for a few weeks, the nanolif remote was responsive every time and when I was suspicious about the ability to determine which direction was activated, it works well. When I turn it, it reliably identifies the right side and activates the associated view.
Many homecut control options use a single button with multiple gestures but the nanolif remote is simple. No need to press, Double Press or Triple Press – I just turned the remote to the right.
Nanolif remote provides more options than other products in the market (you can set the single side in multiple scenes) with 12+ scenes (you can set it in multiple scenes) and at $ 50 it is competitively priced. The scene can only include light panels or you can include other homekit products, which are useful for people with a domination of homekit accessories. My only complaint is to have some error messages in your face in the Nanolif app, which certainly requires some serious improvement.
It takes a few days to memorize 12 parties but I have been amazingly easy to track what is with some use. If you have a nanolif smart panel and want a way to control your other homekit products without the iPhone without the iPhone, the nanolif remote is valuable for purchase price and other remote control options in the market even with applications.
How to buy
The Nanolif Remote can be purchased for $ 49.99 from the Nanolif website and is also available at Apple Retail Store and Apple Online Store.
Starting on Wednesday, 18th July, the fields of nanolif protests will be dedicated to the Apple retail stores where customers can gain experience-enabled nanolif light panels and remote experiences before purchasing.
Note: Nanolif provided a nanolif remote to Macrumars for this review. No other compensation was found.