
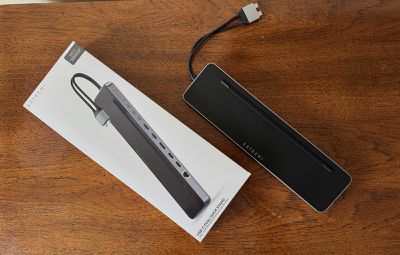
Popular accessory company Satechi offers a variety of docs and hubs that are compatible with Mac Lineup, and I recently spent some time checking the company’s $ 150 USB-C dual dock stand that connects significant amounts to your Mac and even when giving your laptop a bit of a breathing room.
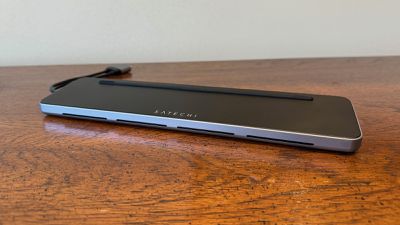
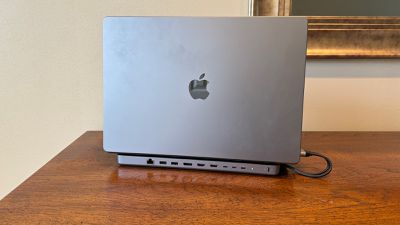
Probably the most noticeable design of the USB-C dual dock stand is right and it is true that it acts as a stand to promote your Mac laptop to a desk, helps to keep things cool in excess Airflow and using your Macke for some more benefits if you can make it closer.
The dock measures about 12 inches (30 cm) wide and its wage-shaped form factor sits nicely under the back of the mac laptop. The rubber’s leg on the dock helps with stability and your mac or dock has an uplifted rubber ridge on the top surface of the dock for not scratching. The opening on the front and lower edges of the dock provides some ventilation for the dock itself, but I didn’t notice anything significantly warm.
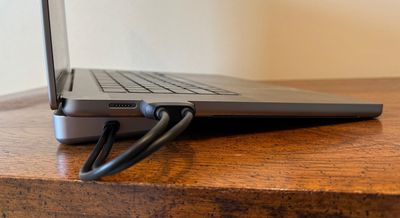
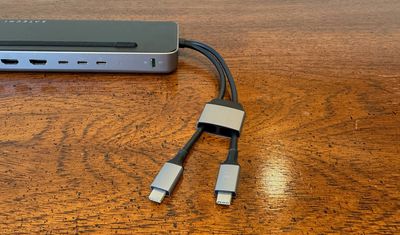
The dock is basically built with space gray aluminum with a black top and has some clear sati branding on the top, though if you are sitting on top of it, all of them will be basically disappearing. A 7.5-inch integrated dual cable holds one end of the dock, ending the dock on your computer to hook the USB-C connectors to hook. There is a space gray collar surrounding the two connectors that the recent mac spaghes them perfectly to attach them to the USB-C ports adjacent to the USB-C ports, or if you have got a compatible machine with different port spaceing, the collar can slide the back to give you more wiggle rooms with separate connectors.
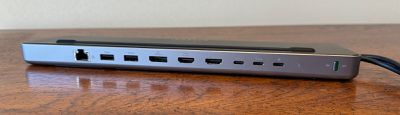
Most of the other features of the dock are on the back side, allowing you to root out of sight on the back of your desk. In addition to the colorful coded sliding power switch and a white LED, the USB-C dual dock stand includes nine ports on the back. There are two USB-C ports (one supports up to 10 Gbps and supports up to 5 Gbps), two USB-A port (up to 10Gbps and up to 5 Gbps) and one gigabit ethernet port if you need wired data connection. For display consistency, there are two HDMI 2.0 ports that support up to 4K display at each 60Hz, and a displayport 1.4 port also supports up to 4K60Hz.
Depending on your Mac, the USB-C dual dock stand can support two external display, both are connected via HDMI or via HDMI and one with one display. Dock’s USB-C ports do not support video, so you cannot attach external display through that approach. If you are driving an Apple Silicon Mac, you need a high-level pro or maximum chips to support dual external display in addition to the built-in display on your laptop. If your machine has a base M3 chip, you can turn off the laptop ID and run two external display, while on the other hand the base M1 or M2 chip machine is limited to an external display.
In addition to Apple Silicon Macs, Microsoft Surface Pro 9 and Surface Laptop Studios, Lenovo Yoga 6 and 7 II, Samsung Galaxy Book 3 Ultra and Dell XPS 15 are also supported by Intel-based MacBook Pro and MacBook Air models.
There is a final port on the back of the dock and it is a USB-C port for taking power. The dock can be driven from the attached Mac but the performance under heavy load will be prevented. Using an external power adapter, which is not provided in the box, but should be easily available for most users, the dock attached Maca can draw up to 15 watts when providing Passthru Power up to 75 Watt, so that all of you requires only one connection to your Mac for everything. I used the 140 watt Apple Power Adapter that came with my MAC MacBook Pro, and I also saw 695 watts of power to my Mac, which quickly re -fuel it and provided all the energy required by the dock to charge it while using it.
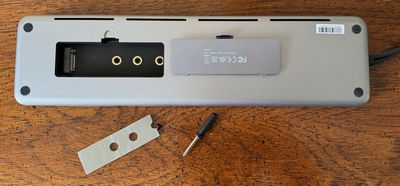
Exceed all the ports in the back. The USB-C dual dock stand has another technique and it is a built-in SSD bay, allowing you to add some external storage (separated separately) for backup or additional storage space without any additional physical space. The enclosure receives M2 STA up to 6GBPS for SATA drive and 10GBPS for NVME SSD and NVME drive. The SSD size of 2242, 2260 and 2280 is all supported and I have used a fast 2 TB WD_Black NVME drive in the form of 2280 for my exam.
The installation was fairly easy, to access the drive bay to prepare to add SSD and installation of a glue thermal pad was needed easily removed a cover at the bottom of the dock. From there, it was a matter of sliding SSD on the bay socket, it was a matter of pressing it with flat pressing and securing it with screws and screw drivers. It was somewhat finik process to get small screws in the appropriate location in the drive bet, but it took a few minutes to combine everything.
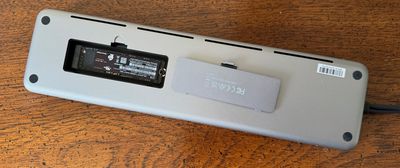
With the installing SSD in the dock, the drive mounts the drive when connected to Mac that makes you access to more storage. My test showed the speed of 975 MB/second and the speed of reading 880 MB/second and there are of course external enclosure that could support the speed quickly with this drive, the performance was quite strong.
USB ports proved to be somewhat more than mixed bags. The ports of this dock are basically intended to be used for data use, so they do not provide significant charging capabilities. They provide sufficient energy to support most short-dimensions like thumb drive or even my stream deck, but they struggle more with high-power devices like bus-driven SSD. When I was connected to the 5GBPS USB-C port of the dock, my test enclosure worked finely, but when my Mac attached the enclosure to the 10GBPS USB-C port, I fired an error about drawing too much energy. So simply be aware that this dock provides some great flexibility for USB connection, you will not be able to connect high-powerful peripherals like Apple Superdrive or quickly to recharge an iPhone.
Display connectivity like you would expect, and I had no problem with a pair of 4K external display at Dual HDMI or HDMI/Displopportport configuration. It was nice to see the display displayed through the dock and I didn’t feel any connection glits. It is worth emphasizing that there is no support for the USB-C/Thunderbolt display and maximum 4K than HDMI and Thunderbolt, you will not be able to use a high-resolution display like Apple Studios Display with this dock. However, the popularity of 4K options means that many users will use the display that already works.
I noticed that plugging and plugging some Befire connectors like HDMI and Doc from Doc from the dock and dock could be somewhat complicated because the dock underneath my MAC MacBook Pro, but I got stabilized on both ends while connecting the connectors. Fortunately, one of the main things of a dock is to allow all your peripherals to be connected, so you don’t need to plugging and plugging both things very frequently.
Overall, Satechi’s USB-C Dual Dock Stand provides their MacBook Desk setup a great feature for beef for beef. It provides enough port for some additional connection, Plus on board SSD Bay is a great inclusion. The dock form factor means it can be clearly taken out when providing some minor argonic benefits. And it is about a foot long time, it can include an onboard SSD and the bus power or USB-C power adapter is probably already in your bag, it is fairly carried.
The dock is missing a few features such as supporting USB-C display connections and an SD card reader, but if its feature set meets your needs, it is worth considering. When you can find some USB-C hubs with a low dual 4K display support, $ 150 is not really bad price considering this dock. Just remember that if you want to take advantage of this feature, you need to spend a little more to get inside SSD.
The USB-C Dual Dock Stand is available directly from Satechi to $ 149.99, but it is at $ 129.99 during this review in B&H Photo.
Note: Satechi provided the USB-C with a dual dock stand for this review. No other compensation was found. An authorized partner with Macrumors Satechi and B&H Photo. When you click a link and make a purchase, we can pay a small payment, which helps our site continue.